
Table of Contents
Data files must be submitted as comma-delimited CSV or TXT files in flat-file format. A flat file contains a plain text table with columns separated by commas and rows separated by lines. For example, if you had a table of student names, ages, and favorite colors for four students named Tim, Sally, Dina, and Rob, it would be formatted in a flat-format file as follows:
Student Name,Age,Favorite Color

Tim,19,Green

Sally,25,Blue

Dina,20,Purple

Rob,21,Red
You may create a data file in a spreadsheet application like Microsoft Excel or a plain text editor like Notepad. If you use Excel, follow these steps to save the file as a CSV file. Make sure you have made all necessary changes in Excel before you save it as a CSV file.
- Click File > Save As.
- Select a location to save your file.
- Enter the file name (see File Name below for requirements).
- From the file type drop-down, select CSV (Comma delimited) (*.csv).
- Click Save.
If you are creating your data files in Excel, you must convert any numerical values with leading zeroes to text format. If these values are saved in numerical format, the leading zeroes will disappear. For example, if your organization ID is 00123000, Excel will change the numerical value to 123000. If you convert the value to text format, Excel will save it as 00123000.
For data file formatting templates, see Data File Templates.
File Size
Data files can be any size. The biggest single file we have received contained over 2 million records. However, very long files are more difficult to review and resolve errors. We recommend keeping file sizes as small as possible.
File Name
To ensure that your data files are securely uploaded to your PDP account, you must follow a specific file name format. Your file name must include 4 parts:
- A lower case letter i followed by an underscore ( _ )
- Your FTP Mailbox ID (that you received during your PDP kickoff call) followed by an underscore
- The name of your data file (see details below)
- The file extension (*.csv or *.txt)
Part 3 can be any file name you like, but for tracking purposes, we recommend including the name of your institution, the type of data file you are submitting, and the term during which you are submitting the file. If you are submitting Version 2.0 data elements, we recommend that you also include “V2” in part 3. See Optional Version 2.0 Data Elements below for more information.
The only special characters you can use in the file name are underscores and a single period before the file extension. Do not use spaces.
Recommended Format
<i_FTPMailboxID>_<InstitutionName>_<FileType>_<Term>(_V2).csv/txt
Examples
If you are submitting a cohort data file in TXT format in the fall 2020 term for Greendale Community College, and you are submitting Version 2.0 data elements, you should include the following information in your file name:
- Greendale Community
- Cohort
- Fall 2020
- V2
The filename would look like the following:
i_123456PDP_GreendaleCommunity_Cohort_Fall2020_V2.txtIf you are submitting a course data file in CSV format in the spring 2020 term for Greendale Community College, and you are NOT submitting Version 2.0 data elements, you should include the following information in your file name:
- Greendale Community
- Course
- Spring 2020
The filename would look like the following:
i_123456PDP_GreendaleCommunity_Course_Spring2020.csvData Elements
Watch the video below to learn about the data elements you will need to include in your PDP data submission files.
Variables
Variables identify the values you should include in your data file fields. There are six types of variables:
- Alphabetic: Can only include letters and certain special characters
- Numeric: Can only include numbers (including decimals)
- Alphanumeric: A combination of letters and numbers and certain special characters
- String: Any combination of letters, numbers, and special characters
- Enumerated: Must be one of a list of valid codes
- Date: A date or date range in any format, such as YYYY-YY or YYYYMMDD
Different fields contain different types of variables that are either required, not required, or required based on certain conditions. For any variables that are not required, you may populate the fields or leave them blank.
Do not enter NULL in any data file fields. If a required value is unknown or unavailable, check the field instructions for accepted values.
For alphabetic and alphanumeric variables, if the value contains a comma, you must surround the text in double quotes. For example, if a student’s address includes Burkes, Place, you should format it as follows:
“Burkes, Place”Quotation marks count against any character limit for the field.
Optional Version 2.0 Data Elements
We have recently added optional data elements to the Cohort and Course data files for version 2.0. These data elements are listed in Cohort Data File and Course Data File below in the “Optional Version 2.0 Data Elements” sections. The file format is the same for both versions.
If you choose to submit any of the optional version 2.0 data elements:
- You must include all of the version 2.0 variables in the column header record, even if you are only populating some of them. If you choose to submit only some of the optional version 2.0 data elements, leave the rest of the version 2.0 variables blank.
- You must enter 2.0 in the Version field of the Header Record. See Formatting the Header Record for details.
- We recommend that you include “V2” in the name of your data file to clearly identify version 2.0 files in the PDP secure portal. See File Name for more information.
Filler Fields
Data files cannot include any blank lines; however, some records may include filler fields, which you should leave blank. These fields are placeholders for variables that may be added in the future. Do not add a space to a filler field. Treat it as if there is content in the field and add commas. For example, a filler field surrounded by four numeric fields would be formatted as follows:
22,14,,75,8If a filler field appears at the end of a record, do not add an additional comma. For example, a record containing four numeric fields followed by a filler field would be formatted as follows:
22,14,75,8,If multiple filler fields appear in a row, enter one comma for each filler field. For example, three filler fields surrounded by two numeric fields would be formatted as follows:
14,,,,75Records
All data files must include four types of records:
- Header Record: Indicates the beginning of the data file. Must be the first line of the file.
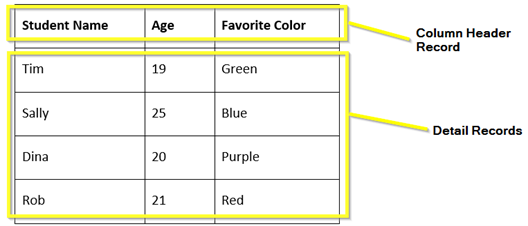
- Column Header Record: Contains the headings for the data in the file, like the header row of a table. The column headings must match the values in the detail records. Must be after the header record and before the detail records.
- Detail Records: Contain the data you are submitting, like the rows in a table. Include one data record for each student. The values must match the column headers in the column header record. Must be after the column header record and before the trailer record.
- Trailer Record: Indicates the end of the data file. Must be the last line of the file.
List the records in the data file in order on separate lines as follows:
Header Record

Column Header Record

Detail Records

Trailer Record
Make sure the column headers in the column header record match the values in the detail records. Using the previous example, you can picture the column header record and detail records like this:
Do not add extra commas to the end of a record. This will cause an error when the data is processed.
Previous: Creating a Data File | Next: Formatting the Header Record
