It is extremely important to keep your school’s list of Clearinghouse contacts up to date. As you add and update staff contacts, you will need to assign area(s) of responsibility to them.
As the user administrator, the options under the Account Management tab, enable you to add, view, and update your Clearinghouse contacts anytime.
- Edit Your Account
- Change Expired Passwords
- Add a New User
- View Existing Users
- Manage Your Users
- View Deleted Users
- Query Access Permissions
> Edit Your Account
You can also review and update your own personal contact information on the Account Management tab:
1. Select the Account Management tab or “My Account” link on the top-right corner of the page.
2. Edit or replace the Name, Title, Address, Email, and Phone fields as you see fit. (You will not be able to change your Web user ID.)
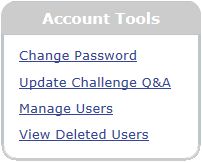
3. If you want to change your password, click Change Password under the Account Tools menu.
4. If you want to view or change your challenge questions and answers, click Update Challenge Q&A.
5. Click Submit > to save your changes.
> Change Expired Passwords
Due to security reasons, your password to the Clearinghouse secure site will expire every 90 days.
On or after the date of expiration, you will be prompted to change your password upon successful login to the Clearinghouse secure Web site. Once agreeing to the user terms and conditions, submit and save your new password. You will then be asked to review or create security questions and answers.
Password cannot contain spaces.
You can also change your password anytime via the Account Management tab or “My Account“ link.
> Add a New User
Only your Clearinghouse user administrator can add a new user account. To create an account for a new Web user using the Account Management tab:
1. Select the Account Management tab and then click Manage Users under the Account Tools menu (only available for the user administrator).
2. Review the user administration terms and conditions and click I Accept, before you can view the Manage Users page.
3. Select Create a New User, which appears on the bottom-right corner of the screen.

4. Enter the requested contact information for the user (First, Last, and Email Address fields are required).
5. Click Submit >.
6. A popup window will notify you that the new user has successfully been saved. Click OK.
7. Once the new user’s personal information is added, you’ll be prompted to add Query Access Permissions (if appropriate), Roles, and Web ID (if Web-related roles are selected).
8. Click Submit > to save the changes.
> View Existing Users
It is extremely important to keep the list of your school’s Clearinghouse contacts up to date. This ensures that essential communications from the Clearinghouse are received by your institution and that your information remains secure and accessible only to the appropriate parties.
To view your existing Clearinghouse contacts (only for user administrators):
1. Select the Account Management tab and then click Manage Users under the Account Tools menu.
2. Review the user administration terms and conditions and click I Accept, before you can view the Manage Users page.
3. A list of the current contacts at your institution, their respective areas of responsibility (roles), and the Web ID (if available) are displayed. Use the scroll bar to see the full list.
For an explanation of the various responsibility types, see the User Role Types topic.
> Manage Your Users
Under the Manage Web User option, you can make updates to Web user contact information, reset passwords, and activate/deactivate Web accounts.
To edit an existing user:
1. Select the Account Management tab and then click Manage Users under the Account Tools menu.
2. Review the user administration terms and conditions and click I Accept, before you can view the Manage Users page.
3. You’ll see the complete list of all user accounts. To make changes to an account, click on the contact’s name.
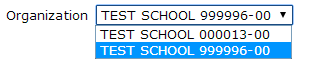
4. If you are an authorized user administrator for more than one school profile, you will see an Organization dropdown listing all the schools that you can manage. Select the school from the dropdown to manage users associated with that school.
5. To update personal details, edit the fields under the “Personal Information” section.
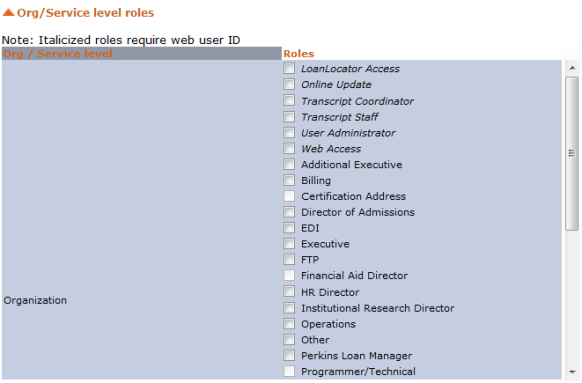
6. To update his or her service roles, you can check or uncheck any of the options under the Roles column. If you hover your mouse over each role, you will see a brief description.
7. Click Submit to save all changes.
8. Under “Account Details,” you’ll see the current account status for this person. To remove access to an old account that is no longer being used, click Delete User Profile. If you need to reassign a required role, you will be prompted to do so.

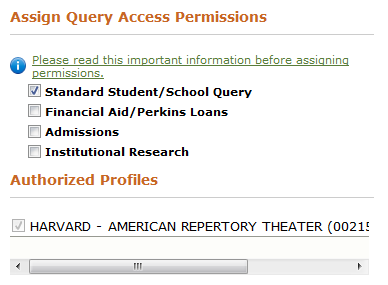
9. To update his or her StudentTracker® query access permissions, check or uncheck any of the options under Assign Query Access Permissions. If desired, click the  button to see a brief description of each role.
Also see Query Access Permissions topic.
NOTE: StudentTracker Web queries are available only to schools participating with StudentTracker (Web access is required).
For an explanation of the various responsibility types, see the User Role Types topic.
> View Deleted Users
The user administrator (if your organization has a Clearinghouse account) has the ability to view a list of your organization’s deleted users.
To view a list of deleted users:
1. Click either the Account Management tab or Edit Your Account under the right menu (you can also click the “My Account” link in the upper-right corner).
2. Select View Deleted Users under the Account Tools menu (this option is only available for the user administrator).
3. A list of the deleted contacts from your institution is displayed. In it, you’ll find their Web IDs, their deletion dates, and the Web ID of the person who deleted each user. This page can be filtered or sorted.

This list is automatically sorted by time stamp from newest to oldest.
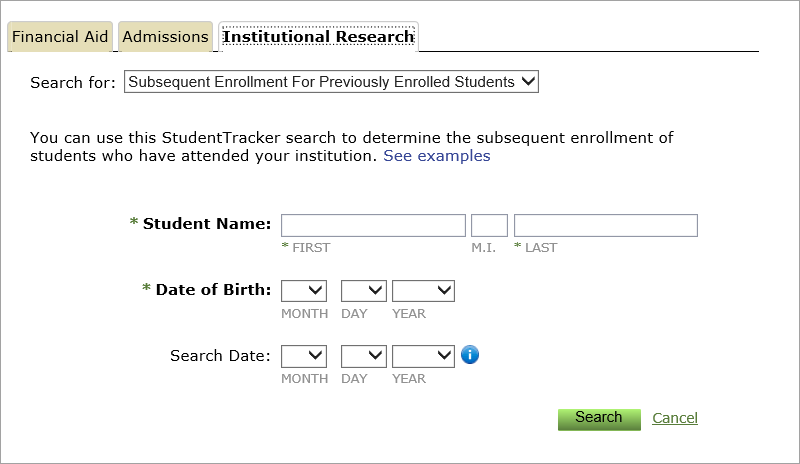
> Query Access Permissions
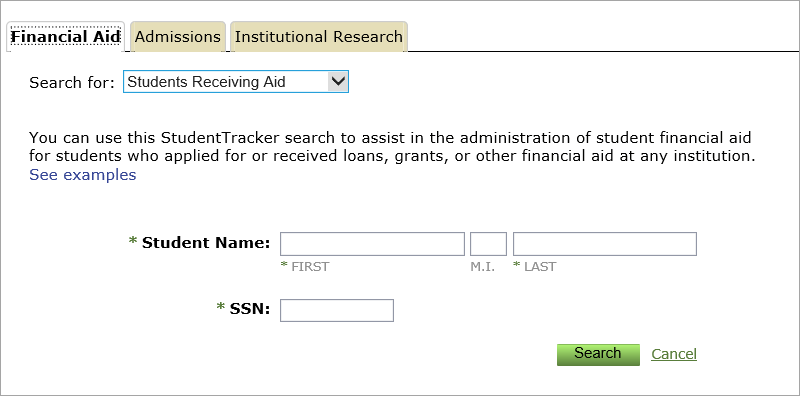
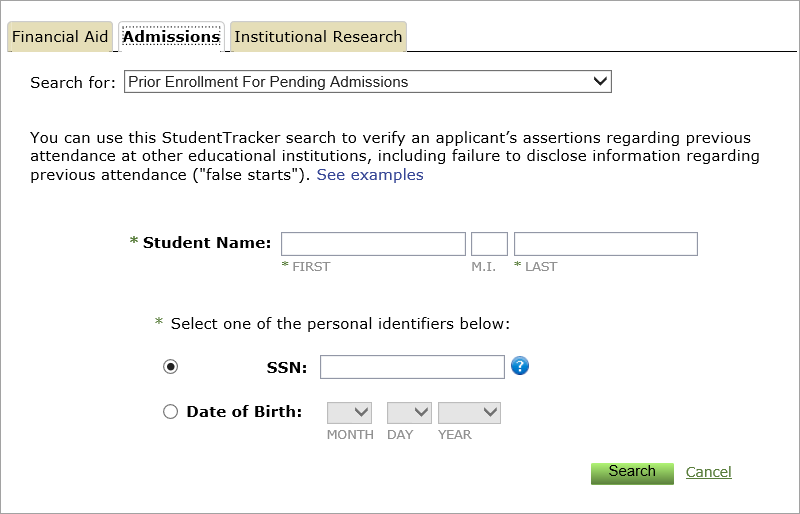
Query access permissions authorize users to access the different types of standard and StudentTracker® Web queries. To use the Financial Aid, Admissions, or Institutional Research queries (Research Services), your institution must have an active StudentTracker® for Colleges and Universities subscription.
Standard Student/School Queries: User has access to the secure portion of the Clearinghouse Web site and can view student enrollment and notification histories as well as school-level information, such as your institution’s transmission schedule and SSCR processing history. (This will grant you basic Web access for the Student Look-Up, Student Reporting, and Transcript Services tabs. All new Web users are automatically assigned this query type, but you can uncheck this access level for security and FERPA purposes, if necessary.)
Research Services
Financial Aid: User can view the Clearinghouse database to assist in the administration of financial aid, including deferring Perkins Loans, responding to student deferment inquiries, verifying and/or challenging cohort default rates, applying for additional work/study financing or Perkins Loan funding, and confirming the enrollment status of a student’s sibling or parent. This access is usually granted to financial aid or business office personnel.
Admissions: User can view the Clearinghouse database to verify an applicant’s assertions regarding previous attendance at other institutions or determine the final enrollment decisions of applicants. This access is usually granted to admissions directors, institutional researchers, and/or enrollment managers.
Institutional Research: User can view the Clearinghouse database to determine the subsequent educational experience of their dropouts, graduates, and previously enrolled students. This access is usually granted to registrars, institutional researchers, and/or enrollment managers.